
7/25/2016 Webmaster
Introduction To FormFlow With The Microsoft Bot Framework
Using FormFlow with the Microsoft Bot Framework, allows you to quickly create a guided conversation, to gather information from a user, with the least amount of code. While it is less flexible than using Dialogs, it can be combined with Dialogs to increase its functionality.
A Walk-Thru
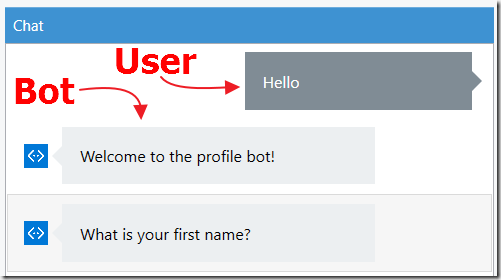
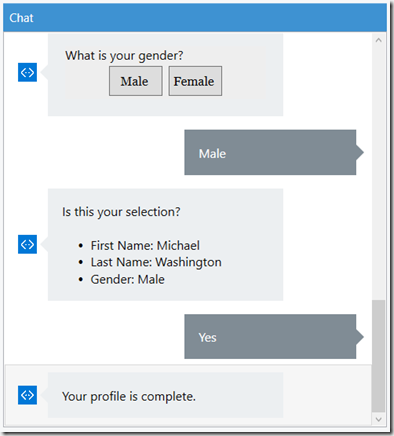
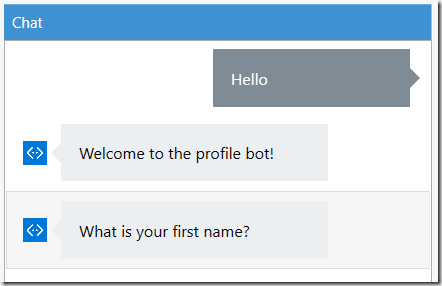
When a user begins a conversation with the Bot, it introduces itself, and asks the user’s name.
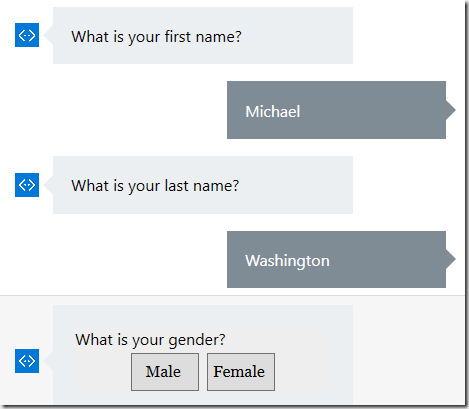
The Bot proceeds to ask questions and gather the responses.
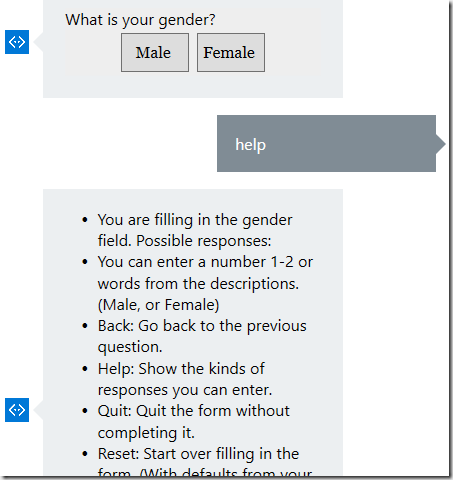
A feature of FormFlow is that the user can type help at any time to obtain assistance with any question or the FormFlow itself.
As a developer, you get this functionality without the need to write any additional code.

The FormFlow continues until the form is complete.
Creating The Project

Download the Visual Studio 2015 Microsoft Bot Framework template (using this link)
Save the .zip file in the templates directory (located at: %USERPROFILE%\Documents\Visual Studio 2015\Templates\ProjectTemplates\Visual C# ).
This creates a template that you can use in Visual Studio to create Bot projects.

Open Visual Studio.

Create a new Project.
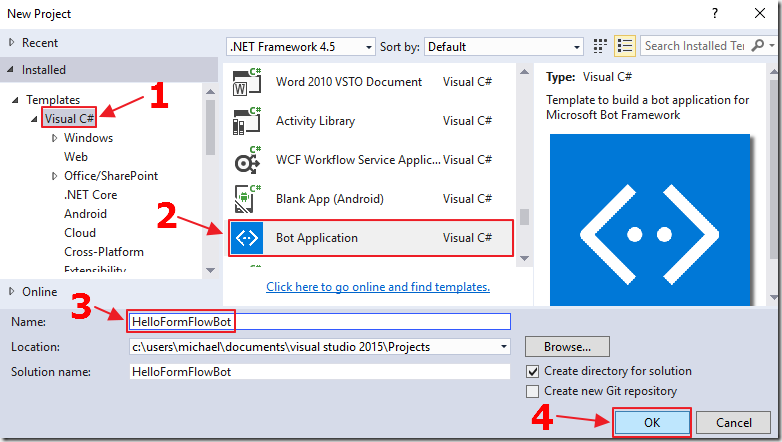
Select the Bot Application template and name the project HelloFormFlowBot.
The project will be created.
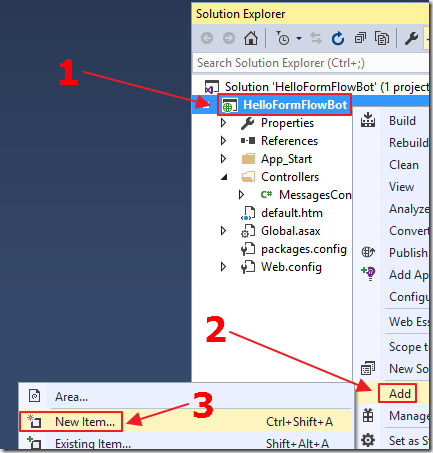
Right-click on the project, and select Add then New Item.
We will now create the class that will contain the logic for our FormFlow.
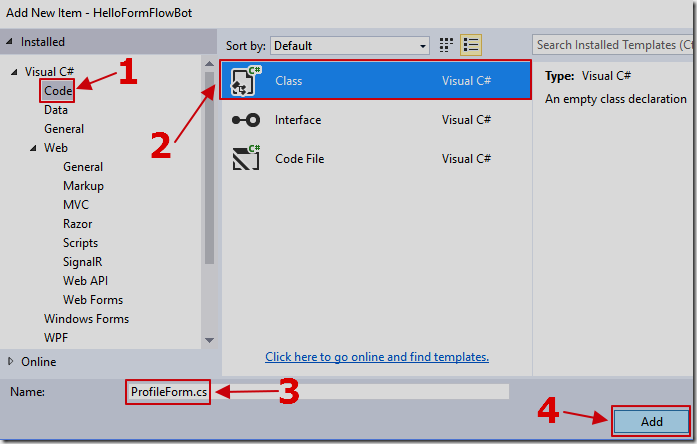
Add a new C# class called ProfileForm.cs.
Replace all the code with the following code:
using System;
using Microsoft.Bot.Builder.Dialogs;
using Microsoft.Bot.Builder.FormFlow;
namespace HelloFormFlowBot
{
    [Serializable]
    public class ProfileForm
    {
        // these are the fields that will hold the data
        // we will gather with the form
        [Prompt("What is your first name? {||}")]
        public string FirstName;
        [Prompt("What is your last name? {||}")]
        public string LastName;
        [Prompt("What is your gender? {||}")]
        public Gender Gender;
        // This method 'builds' the form
        // This method will be called by code we will place
        // in the MakeRootDialog method of the MessagesControlller.cs file
        public static IForm<ProfileForm> BuildForm()
        {
            return new FormBuilder<ProfileForm>()
                    .Message("Welcome to the profile bot!")
                    .OnCompletion(async (context, profileForm) =>
                    {
                        // Tell the user that the form is complete
                        await context.PostAsync("Your profile is complete.");
                    })
                    .Build();
        }
    }
    // This enum provides the possible values for the
    // Gender property in the ProfileForm class
    // Notice we start the options at 1
    [Serializable]
    public enum Gender
    {
        Male = 1, Female = 2
    };
}
This code indicates the fields we will gather with our FormFlow.
Notice that the class, as well as the Gender enum that it consumes, is marked [Serializable].
The Microsoft Bot Framework requires that the classes must be serializable so the Bot can be stateless.
Save the file.
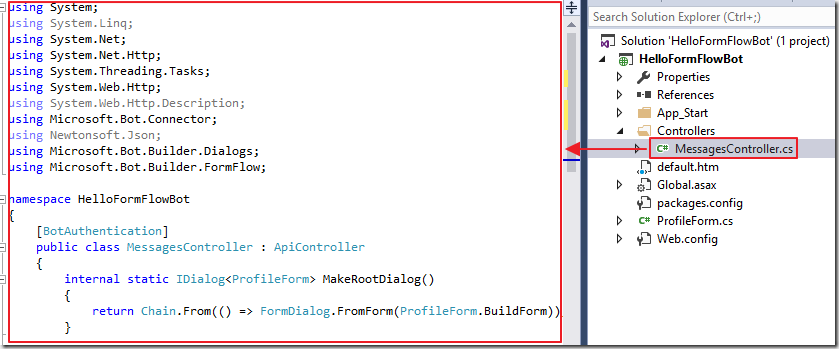
Open the MessagesController.cs file.
Add the following using statements at the top of the file (to support the FormFlow code):
using Microsoft.Bot.Builder.Dialogs;
using Microsoft.Bot.Builder.FormFlow;
Add the following MakeRootDialog method to the MessagesController class (to call the BuildForm method in the ProfileForm class we created earlier):
    internal static IDialog<ProfileForm> MakeRootDialog()
    {
        return Chain.From(() => FormDialog.FromForm(ProfileForm.BuildForm));
    }
Finally, alter the Post method in the MessagesController class to the following:
    public async Task<HttpResponseMessage> Post([FromBody]Activity activity)
    {
        // Detect if this is a Message activity
        if (activity.Type == ActivityTypes.Message)
        {
            // Call our FormFlow by calling MakeRootDialog
            await Conversation.SendAsync(activity, MakeRootDialog);
        }
        else
        {
            // This was not a Message activity
            HandleSystemMessage(activity);
        }
        // Return response
        var response = Request.CreateResponse(HttpStatusCode.OK);
        return response;
    }
Save the file.
Test The Application
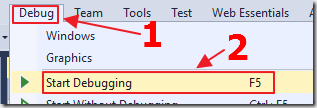
Hit F5 to run the application.
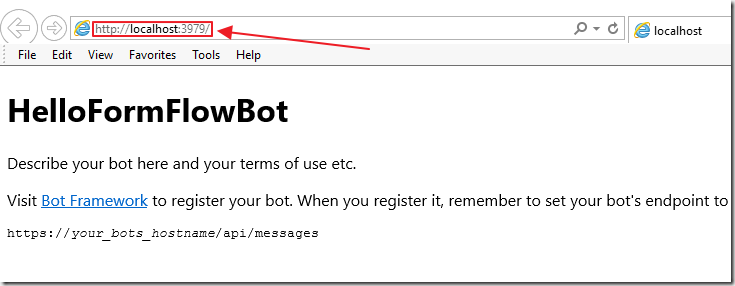
The web browser will open.
Note the port number and the web address.
Download, install, and run the Bot Framework Emulator (Windows) (also see: Mac and Linux support using command line emulator if you don’t have Windows).
When the emulator starts, connect to the Bot by setting the address to the the one indicted in the web browser (however, add /api/messages to the end).

Ensure that the Bot Url is connecting to the correct address.

Type a message, and click the send key (or press Enter).
You can now converse with the Bot and fill out the FormFlow.
Saving The Data
Currently the application does not save the responses from the user. In fact, after you fill the FormFlow out, it will simply ask you to fill it out again.
We can use the Bot State Service to save and retrieve the values.
Alter the BuildForm method in the ProfileForm.cs file to the following (to save the values entered into the form):
    public static IForm<ProfileForm> BuildForm()
    {
        return new FormBuilder<ProfileForm>()
                .Message("Welcome to the profile bot!")
                .OnCompletion(async (context, profileForm) =>
                {
                    // Set BotUserData
                    context.PrivateConversationData.SetValue<bool>(
                        "ProfileComplete", true);
                    context.PrivateConversationData.SetValue<string>(
                        "FirstName", profileForm.FirstName);
                    context.PrivateConversationData.SetValue<string>(
                        "LastName", profileForm.LastName);
                    context.PrivateConversationData.SetValue<string>(
                        "Gender", profileForm.Gender.ToString());
                    // Tell the user that the form is complete
                    await context.PostAsync("Your profile is complete.");
                })
                .Build();
    }
We are not only storing the values provided by the user, but we are also setting a flag (ProfileComplete), so that we don’t ask the user to fill out the form again.
Finally, alter the Post method in the MessagesController class to the following:
    public async Task<HttpResponseMessage> Post([FromBody]Activity activity)
    {
        // Detect if this is a Message activity
        if (activity.Type == ActivityTypes.Message)
        {
            // Get any saved values
            StateClient sc = activity.GetStateClient();
            BotData userData = sc.BotState.GetPrivateConversationData(
                activity.ChannelId, activity.Conversation.Id, activity.From.Id);
            var boolProfileComplete = userData.GetProperty<bool>("ProfileComplete");
            if (!boolProfileComplete)
            {
                // Call our FormFlow by calling MakeRootDialog
                await Conversation.SendAsync(activity, MakeRootDialog);
            }
            else
            {
                // Get the saved profile values
                var FirstName = userData.GetProperty<string>("FirstName");
                var LastName = userData.GetProperty<string>("LastName");
                var Gender = userData.GetProperty<string>("Gender");
                // Tell the user their profile is complete
                System.Text.StringBuilder sb = new System.Text.StringBuilder();
                sb.Append("Your profile is complete.\n\n");
                sb.Append(String.Format("FirstName = {0}\n\n", FirstName));
                sb.Append(String.Format("LastName = {0}\n\n", LastName));
                sb.Append(String.Format("Gender = {0}", Gender));
                // Create final reply
                ConnectorClient connector = new ConnectorClient(new Uri(activity.ServiceUrl));
                Activity replyMessage = activity.CreateReply(sb.ToString());
                await connector.Conversations.ReplyToActivityAsync(replyMessage);
            }
        }
        else
        {
            // This was not a Message activity
            HandleSystemMessage(activity);
        }
        // Send response
        var response = Request.CreateResponse(HttpStatusCode.OK);
        return response;
    }
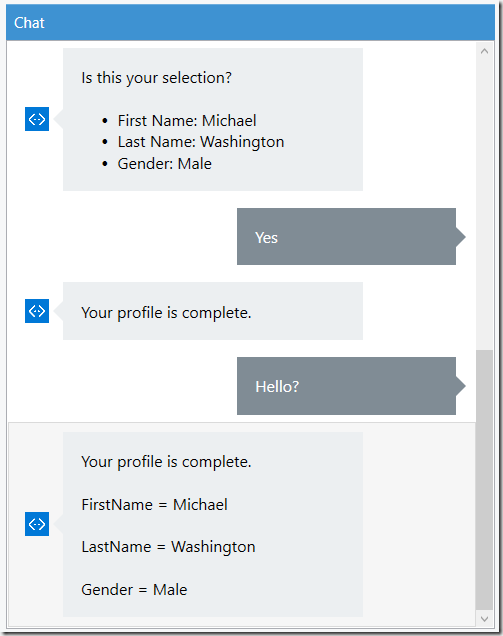
Now the application will only ask the user to fill in the form one time, and display the values received using the Bot State Service.
The values will be persisted by the Microsoft Bot Framework keyed to that user in that conversation.
In our example we used PrivateConversationData, but the Bot State Service exposes the following methods, each with a different scope:
Method
Scoped
Description
SetUserData()
User
Remembering context object with a user
SetConversationData()
Conversation
Remembering context object with a conversation
SetPrivateConversationData()
User & Conversation
Remembering context object with a person in a conversation
Microsoft Links
Bot Framework Forum (stack overflow)
Visual Studio 2015 Bot Project Template
Bot Framework Emulator (Windows)
Download
You can download the code from the Download page