
10/3/2018 Webmaster
Using Dialogs (MS Bot Framework V4 Edition)
The Microsoft Bot Framework V4 allows you to create intelligent bots that interact naturally wherever your users are (text/SMS to Skype, Slack, Office 365 mail and other popular services). The Bot Builder V4 SDK offers new features and is extensible with a pluggable middleware model.
In this article we will build on the example started in the following article: Creating a Hello World! Bot (MS Bot Framework V4 Edition). In this article we will cover using Dialogs.
Requirements
- Visual Studio 2017 (or higher) with the following workloads:
- ASP.NET and web development
- Azure development
- .NET Core cross-platform development
- The code from the article: Creating a Hello World! Bot (MS Bot Framework V4 Edition) (it is on the Downloads page of this site)
- Bot Framework Emulator (download the latest version even if it is “Alpha”)
What Are Dialogs?
A dialog encapsulates application logic much like a function does in a standard program. It allows you to perform a specific task, such as gathering the details of a user’s profile, and then possibly reuse the code as needed. Dialogs can also be chained together in DialogSets.
The Microsoft Bot Builder SDK includes two built-in features to help you manage conversations using dialogs:
- DialogSets - This is a collection of Dialogs. To use dialogs, you must first create a dialog set to add the dialog to. A dialog can contain only a single waterfall step, or it can consist of multiple waterfall steps.
- Prompts - This provides the methods you can use to ask users for different types of information. For example, a text input, a multiple choice, or a date or number input. A prompt dialog uses at least two functions, one to prompt the user to input data, and another function to process and respond to the data.
Limitations Of The Previous Example
The limitation with the code created in the previous example (Creating a Hello World! Bot (MS Bot Framework V4 Edition)) is:
- All code logic is on the main path
- There is no easy way to encapsulate individual logic
- There is no way to reuse code logic
- As the code gets bigger there will be more if..then statements, creating spaghetti code
Add Support To Use Dialogs
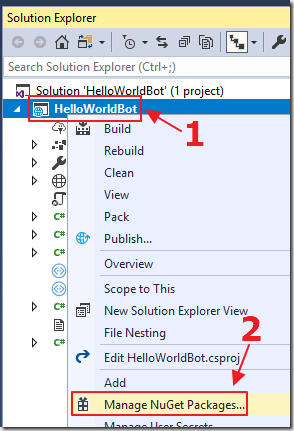
To use Dialogs, we first need to install the NuGet package.
Open the project created in the article: Creating a Hello World! Bot (MS Bot Framework V4 Edition) in Visual Studio 2017 (or higher).
Right-click on the project node and select Manage NuGet Packages.
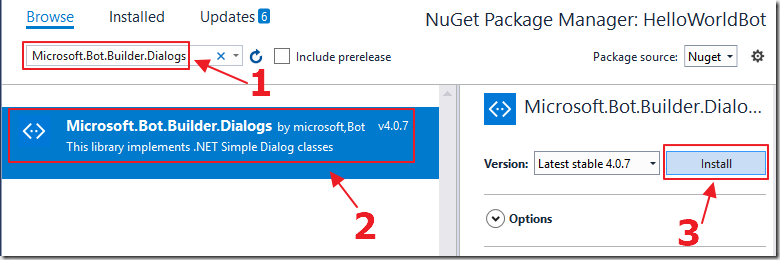
Search for Microsoft.Bot.Builder.Dialogs.
Click on Microsoft.Bot.Builder.Dialogs, then click the Install button.
(accept any other screens that appear and fully install the package)
A Simple Dialog
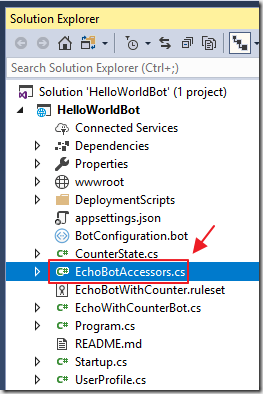
Open the EchoBotAccessors.cs file that contains the EchoBotAccessors class.
The EchoBotAccessors class is a class containing properties that will be passed as a singleton to our main code, through its constructor, using dependency injection.
Add the following using statement to the top of the file:
using Microsoft.Bot.Builder.Dialogs;
Next add the following property to the class (to hold the Dialog state):
public IStatePropertyAccessor<DialogState> ConversationDialogState { get; set; }
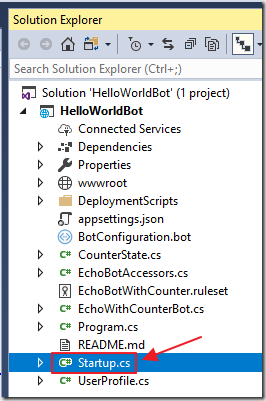
Next, open the Startup.cs file.
Add the following using statement to the top of the file:
using Microsoft.Bot.Builder.Dialogs;
in the services.AddSingleton<EchoBotAccessors> section,
change the var accessors = new EchoBotAccessors(conversationState) section to the following (to add the ConversationDialogState created earlier):
    // Create the custom state accessor.
    // State accessors enable other components to read and write individual properties of state.
    var accessors = new EchoBotAccessors(conversationState)
    {
        CounterState = conversationState.CreateProperty<CounterState>(EchoBotAccessors.CounterStateName),
        ConversationDialogState = conversationState.CreateProperty<DialogState>("DialogState"),
    };
This adds EchoBotAccessors class, and its properties (including ConversationDialogState) to the accessors so that we can access it in our main code (EchoWithCounterBot class), when the accessors is passed to the constructor of the EchoWithCounterBot class using dependency injection.
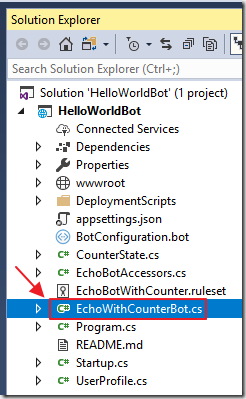
Next, open the EchoWithCounterBot.cs file. This is the main code file.
Add the following using statement to the top of the file:
using Microsoft.Bot.Builder.Dialogs;
Add the following global property to the top of the class to hold the dialogs:
private DialogSet _dialogs;
Now, add two dialog waterfall steps to the end of the class:
    private static async Task<DialogTurnResult> NameStepAsync(
        WaterfallStepContext stepContext, CancellationToken cancellationToken)
    {
        // Running a prompt here means the next WaterfallStep will be
        // run when the users response is received.
        return await stepContext.PromptAsync(
            "name", new PromptOptions { Prompt = MessageFactory.Text("What is your name?") }
            , cancellationToken);
    }
    private async Task<DialogTurnResult> NameConfirmStepAsync(
        WaterfallStepContext stepContext, CancellationToken cancellationToken)
    {
        // We can send messages to the user at any point in the WaterfallStep.
        await stepContext.Context.SendActivityAsync(
            MessageFactory.Text($"Hello {stepContext.Result}!"), cancellationToken);
        // WaterfallStep always finishes with the end of the Waterfall or with another dialog,
        // here it is the end.
        return await stepContext.EndDialogAsync(cancellationToken: cancellationToken);
    }
The first step (NameStepAsync) asks the user’s name. The second step (NameConfirmStepAsync), retrieves the name and uses it to greet the user by saying ‘Hello’.
Change the constructor of the class to the following:
        public EchoWithCounterBot(EchoBotAccessors accessors)
        {
            // Set the _accessors
            _accessors = accessors ?? throw new System.ArgumentNullException(nameof(accessors));
            // The DialogSet needs a DialogState accessor, it will call it when it has a turn context.
            _dialogs = new DialogSet(accessors.ConversationDialogState);
            // This array defines how the Waterfall will execute.
            var waterfallSteps = new WaterfallStep[]
            {
                NameStepAsync,
                NameConfirmStepAsync,
            };
            // Add named dialogs to the DialogSet. These names are saved in the dialog state.
            _dialogs.Add(new WaterfallDialog("details", waterfallSteps));
            _dialogs.Add(new TextPrompt("name"));
        }
This sets up the dialogs but does not invoke them yet.
In the OnTurnAsync method, change the code in the first “else” block to the following:
        // Run the DialogSet - let the framework identify the current state of the dialog from
        // the dialog stack and figure out what (if any) is the active dialog.
        var dialogContext = await _dialogs.CreateContextAsync(turnContext, cancellationToken);
        var results = await dialogContext.ContinueDialogAsync(cancellationToken);
        // If the DialogTurnStatus is Empty we should start a new dialog.
        if (results.Status == DialogTurnStatus.Empty)
        {
            await dialogContext.BeginDialogAsync("details", null, cancellationToken);
        }
Remove the remaining “else” block.
The OnTurnAsync method is called each time the user interacts with the Bot.
The code block above will continue an existing dialog if one is started, or start the dialog on the first waterfall step if it is not already started.
Run The Updated Code
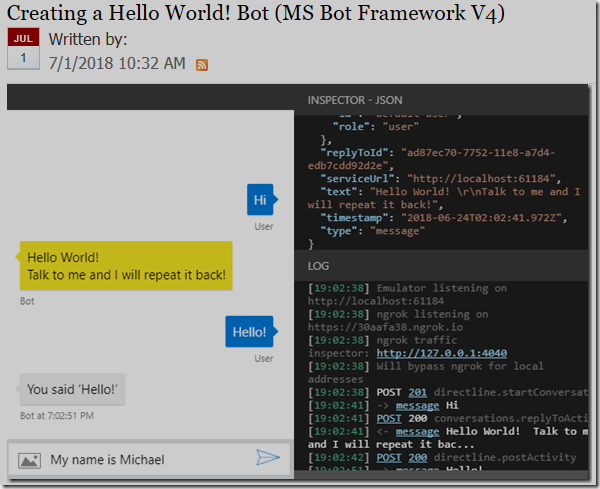
We can now run the application and connect to it with the Bot Framework Emulator (see: Creating a Hello World! Bot (MS Bot Framework V4 Edition) for information on how to do that).
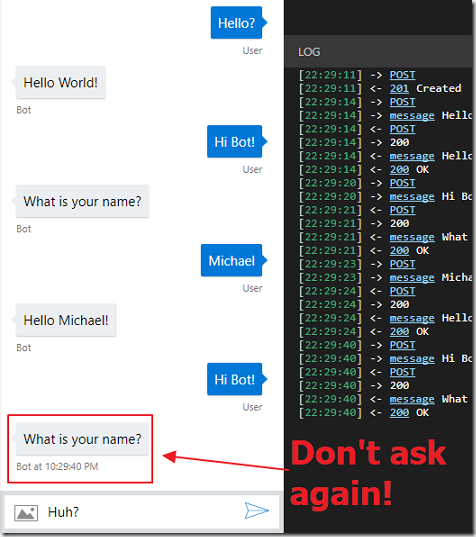
The Bot will great the user, ask the user for their name, greet them by name… and then ask for their name again!
We now see that we need to use user state to track if we have asked the user their name, as we did in the previous article.
In addition, we need to store the user’s name.
Adding User State
We will now alter the Bot to determine if it has asked the user for their name.
If we have not asked the user for their name, we will ask the user for their name, store it in UserState. and then greet them by that name.
In addition, for any further interactions, we will repeat their name back to them with each reply.
Add a new UserProfile class using the following code:
namespace HelloWorldBot
{
    public class UserProfile
    {
        public string Name { get; set; }
    }
}
Open the Startup.cs file.
Add the following code to the bottom of the services.AddBot<EchoWithCounterBot> section:
    // Create and add user state.
    var userState = new UserState(dataStore);
    options.State.Add(userState);
Add the following validation code to the services.AddSingleton<EchoBotAccessors> section:
        var userState = options.State.OfType<UserState>().FirstOrDefault();
        if (userState == null)
        {
            throw new InvalidOperationException(
                "UserState must be defined and added before adding user-scoped state accessors.");
        }
Change the EchoBotAccessors constructor to the following:
        // Create the custom state accessor.
        // State accessors enable other components to read and write individual properties of state.
        var accessors = new EchoBotAccessors(conversationState, userState)
        {
            CounterState = conversationState.CreateProperty<CounterState>(EchoBotAccessors.CounterStateName),
            ConversationDialogState = conversationState.CreateProperty<DialogState>("DialogState"),
            UserProfile = userState.CreateProperty<UserProfile>("UserProfile"),
        };
This adds the UserState and the UserProfile.
You will get build errors at this point until we update the EchoBotAccessors class.
Open the EchoBotAccessors.cs file.
Alter the constructor to the following to pass in the UserState:
    public EchoBotAccessors(ConversationState conversationState, UserState userState)
    {
        ConversationState = conversationState ?? throw new ArgumentNullException(nameof(conversationState));
        UserState = userState ?? throw new ArgumentNullException(nameof(userState));
    }
Add the following properties to hold the UserProfile and UserState:
        public IStatePropertyAccessor<UserProfile> UserProfile { get; set; }
        public UserState UserState { get; }
We are now ready to update the main code.
Open the EchoWithCounterBot.cs file.
Change the NameConfirmStepAsync step from:
        private async Task<DialogTurnResult> NameConfirmStepAsync(
            WaterfallStepContext stepContext, CancellationToken cancellationToken)
        {
            // We can send messages to the user at any point in the WaterfallStep.
            await stepContext.Context.SendActivityAsync(
                MessageFactory.Text($"Hello {stepContext.Result}!"), cancellationToken);
            // WaterfallStep always finishes with the end of the Waterfall or with another dialog,
            // here it is the end.
            return await stepContext.EndDialogAsync(cancellationToken: cancellationToken);
        }
To:
        private async Task<DialogTurnResult> NameConfirmStepAsync(
            WaterfallStepContext stepContext, CancellationToken cancellationToken)
        {
            // We can send messages to the user at any point in the WaterfallStep.
            await stepContext.Context.SendActivityAsync(
                MessageFactory.Text($"Hello {stepContext.Result}!"), cancellationToken);
            // Get the current profile object from user state.
            var userProfile = await _accessors.UserProfile.GetAsync(
                stepContext.Context, () => new UserProfile(), cancellationToken);
            // Update the profile.
            userProfile.Name = (string)stepContext.Result;
            // WaterfallStep always finishes with the end of the Waterfall or with another dialog,
            // here it is the end.
            return await stepContext.EndDialogAsync(cancellationToken: cancellationToken);
        }
This adds code to save the name of the user in the Profile (in the Name property).
Next, in the OnTurnAsync method, change the block of code that executes the dialog from this:
                    // Run the DialogSet - let the framework identify the current state of the dialog from
                    // the dialog stack and figure out what (if any) is the active dialog.
                    var dialogContext = await _dialogs.CreateContextAsync(turnContext, cancellationToken);
                    var results = await dialogContext.ContinueDialogAsync(cancellationToken);
                    // If the DialogTurnStatus is Empty we should start a new dialog.
                    if (results.Status == DialogTurnStatus.Empty)
                    {
                        await dialogContext.BeginDialogAsync("details", null, cancellationToken);
                    }
To this:
                    // Get the user state from the turn context.
                    var user = await _accessors.UserProfile.GetAsync(turnContext, () => new UserProfile());
                    if (user.Name == null)
                    {
                        // Run the DialogSet - let the framework identify the current state of the dialog from
                        // the dialog stack and figure out what (if any) is the active dialog.
                        var dialogContext = await _dialogs.CreateContextAsync(turnContext, cancellationToken);
                        var results = await dialogContext.ContinueDialogAsync(cancellationToken);
                        // If the DialogTurnStatus is Empty we should start a new dialog.
                        if (results.Status == DialogTurnStatus.Empty)
                        {
                            await dialogContext.BeginDialogAsync("details", null, cancellationToken);
                        }
                    }
                    else
                    {
                        // Echo back to the user whatever they typed.
                        var responseMessage =
                            $"Turn {state.TurnCount}: {user.Name} you said '{turnContext.Activity.Text}'\n";
                        await turnContext.SendActivityAsync(responseMessage);
                    }
This code now checks the Profile (in the UserState) to see if the Name is stored. If it is not, the Dialog code runs.
If the Name is present, the text the user sends is simply echoed back to them, using their name.
Finally, we add the following code at the bottom of the OnTurnAsync method to persist the UserState (that contains the Profile).
                // Save the user profile updates into the user state.
                await _accessors.UserState.SaveChangesAsync(turnContext, false, cancellationToken);
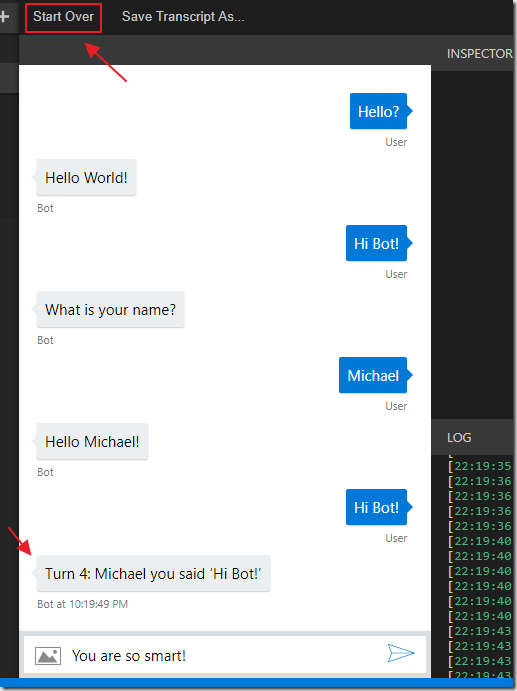
Now, we can run the project, return to the Bot Emulator, click the Start Over button, and chat with the updated Bot.
Links
Azure Bot Service Documentation for the v4 SDK
Using dialogs to manage conversation flow
Create modular bot logic with a dialog container
Conversational AI: Best Practices for Building Bots
Download
You can download the code from the Download page